
Proper cable seal installation is the final step that determines whether a security seal actually performs its job. I have inspected thousands of seals returned from the field as a manufacturing specialist, and time after time I see how a correctly threaded but insufficiently tensioned cable fails to provide reliable tamper evidence. This guide covers each stage of installing a cable seal on a container or trailer, focusing on the practical techniques of tensioning and visual verification that are often missing from basic manuals. The result is a process built on factory‑floor knowledge, so your shipment stays secure across every mile.
What a Cable Seal Is and How It Locks
A cable seal consists of a locking body containing a stainless‑steel ball or jaw mechanism, through which a multi‑strand steel cable is drawn in one direction only. Once the cable passes the locking ball, it cannot be pulled back without cutting—creating a permanent, tamper‑evident closure. High‑security cable seals are tested to ISO 17712 classification, which sets tensile strength and tamper‑evidence performance levels that reputable manufacturers must meet.
Choosing the correct cable diameter for the hasp or staple on your container is the first installation decision. The table below shows typical diameters and their common applications.
| Cable Diameter | Typical Tensile Strength | Recommended Use |
|---|---|---|
| 1.5 mm | 0.5 kN | Meter boxes, light plastic seals |
| 3.0 mm | 2.0 kN | Utility lockers, vehicle compartments |
| 5.0 mm | 5.0 kN | Truck doors, railcar hatches |
| 8.0 mm | 10.0 kN | ISO shipping containers, tanker hatches |
The locking body, cable material, and over‑molding all work together. A seal that looks robust on paper can fail if the cable diameter is mismatched to the lock housing, creating a gap that can be exploited. As a manufacturer, I always recommend verifying the cable‑to‑body fit before buying in bulk.
Checking Cable Seal Compatibility Before You Start
Before touching the seal, confirm three things. First, the cable diameter matches the hasp opening—the cable should pass through snugly but not scrape the edges. Second, the seal body is free of cracks, discoloration, or loose components; any visible damage at this stage means the seal has been compromised before use. Third, record the unique serial number printed on the body or marking flag, and enter it into your tracking system or manifest. This number is the only link between the physical seal and your shipment documentation.
No special tools are required. Gloves are optional but can improve grip when pulling the cable through under tension. If temperatures are below freezing or above 60°C, confirm that the polymer components are rated for the expected range—most standard cable seals handle ‑20°C to +80°C without brittleness, but extremes demand verification.
How to Install a Cable Seal in Four Steps
1. Thread the cable through the hasp
Pass the free end of the cable through the door staple or locking bar, then through the opening in the seal body. The cable must enter from the correct side—the locking ball sits in one direction only, so if you push the cable and it will not advance, you have it reversed. Smooth insertion means the ball is ready to grip.
2. Seat the seal body against the door
Pull the cable until the seal body sits flush against the metal surface. There should be no slack between the seal and the hasp, but do not start pulling hard yet. This initial seating prevents the body from twisting under load later.
3. Tension the cable
Grip the cable tail by hand and pull steadily until all remaining slack is removed. Then continue pulling with one or two firm, hand‑only pulls. The goal is to create tension without stretching the cable. A properly tensioned cable will yield a clear, dull sound when plucked and will not sag. Do not use pliers, wrenches, or any lever—I have seen cable strands flatten and lock bodies crack when leverage is applied, because the instant force exceeds the material’s design limits.
4. Lock the seal
Pull the tail further through the body until you hear or feel a definitive click. The click signals that the locking ball has captured the cable fully. After the click, do not attempt to pull the tail again; any additional force may strip the locking mechanism. Leave roughly 150mm of tail visible for inspection and removal with cutters.
(If your loading docks handle multiple container types, confirm that the seal’s adjustable length range covers all door gaps. Contact us at [email protected] with your standard hasp dimensions, and we will recommend the correct seal length.)
How to Inspect a Cable Seal After Installation
Installation does not end with the click. A quick verification sequence will catch most hidden faults. First, tug the cable tail firmly by hand—it must not slide in any direction. Second, attempt to rotate the seal body; it should stay tight against the door with minimal movement. Third, visually compare the serial number on the seal with your record; mis‑match at this point is a red flag. Fourth, examine the locking body for hairline cracks around the cable entry port, which can appear if the cable was inserted at an angle and forced.
On its own, a tug test is not enough. I recommend pairing every installation with a written log entry that includes the date, seal number, container ID, and the name of the person who applied it. This simple paper trail turns a hardware checkpoint into a full chain‑of‑custody record.
Common Cable Seal Installation Errors That Lead to Failure
The same mistakes show up repeatedly in the field, and most are avoidable with attention to detail.
Insufficient tension
A seal that is not pulled tight leaves room for the cable to be pushed back into the body, compromising tamper evidence. Tension should be firm enough that you cannot easily bend the cable between the seal and the hasp.
Using tools on the cable
Pliers, screwdrivers, or hammers are not part of the installation kit. I have watched our quality team examine seals where the cable cross‑section was flattened to half its original thickness—the locking ball simply could not hold. Hand‑pull only.
Cutting the cable before locking
A worker cuts the excess tail before pulling the seal closed, leaving nothing to grip for removal. Later, the seal has to be forcibly destroyed, and the chance of catching tampering is lost. Always leave a 150mm tail and cut only after locking.
Mismatched diameter
Forcing a cable that is too thick through the lock body can score the internal wall and weaken the retaining lip. Match the diameter to the opening size exactly.
Skipping serial number registration
Without recording the number, there is no independent proof that the seal on arrival is the one applied at departure. This undermines the entire traceability chain.
These are not hypothetical failures. In our factory, we have analyzed returns from logistics operators who believed the seal was defective—only to find that the cable had been cut before locking or tensioned with a wrench, damaging the lock body. The seal was not the problem; the installation was.
When to Choose Cable Seals Over Bolt Seals or Other Types
Every security seal type has a job it does best, and the choice affects installation as much as security level.
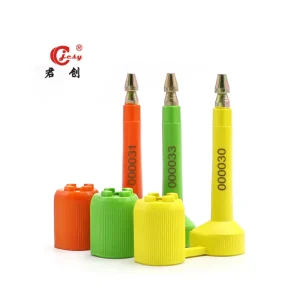
Bolt seals deliver maximum tensile strength and a fixed, unchangeable length. They are excellent for high‑value container shipments where the lock has to survive harsh handling. However, bolt seals cannot be adjusted for different hasp sizes, and they require bolt cutters for removal.
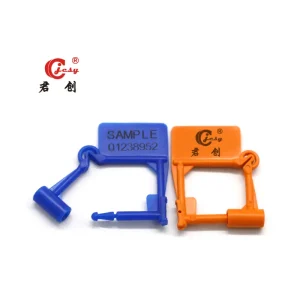
Plastic padlock seals and pull‑tight seals fill the low‑security tier—utility meters, truck compartments, or tamper‑evidence on internal bins. Their installation is simpler, but they offer far lower breaking strength and can be defeated with side cutters.
Cable seals sit in the middle ground: strong enough for container doors and railcar hatches, adjustable to fit most hasps, and easy to install without tools. For mixed fleets where door gaps vary, a cable seal saves time and reduces the inventory of seal types. At our factory, we manufacture all three categories, so we guide customers toward the seal that matches their security requirements and operational workflow—not the one that simply sells for a higher price.
Common Questions About Cable Seal Installation
Can a cable seal be reused after removal?
No. Cable seals are single‑use devices. The locking mechanism is designed to be destroyed during removal with cutters, which ensures that any attempt to re‑thread the cable will leave visible damage. Using a seal twice is the fastest way to create a false sense of security.
What diameter cable seal do I need?
It depends on the hasp opening. For standard container door brackets with a 12mm hole, a 5mm or 8mm cable diameter works well. If your equipment has smaller staples—common on tanker hatches or utility lockers—move down to a 3mm cable. When in doubt, send us a photo of the staple with a ruler for reference, and we will confirm the right diameter.
How can I tell if a cable seal has been tampered with?
Look for stretched cable strands, scratches around the locking body entry port, flattened or crushed cable segments, or a serial number that does not match the manifest. A properly installed seal shows no deformation and the print remains intact. If anything appears suspicious, treat the seal as broken and inspect the cargo immediately.
Will freezing weather affect the seal’s performance?
Standard polymer bodies remain usable down to about ‑20°C. Below that, certain materials can become brittle. If your routes pass through severe cold regions, specify cold‑rated compounds during ordering. Our production team can adjust the body material to handle sub‑zero extremes without sacrificing tamper evidence.
Is a cable seal enough security by itself?
No seal, however well installed, is a standalone solution. It must be part of a larger security protocol that includes driver inspections, recorded serial numbers, and real‑time tracking. The seal proves tampering after the fact; it does not prevent the initial attempt. Use it as one link in the chain, not the whole chain.
If your team is dealing with repeated seal failures or inconsistent cable dimensions, it may be time to review the supplier. Share your seal specifications and estimated monthly volume with us at [email protected] or call +86 13853189290, and we will confirm the correct configuration and provide a factory‑direct quote.
If you’re interested, check out these related articles:
Heavy Duty Cable Tie Applications: Industrial Fastening Solutions – Junchuang Lock
UV Resistant Security Seals: Protecting Assets from Sun Degradation – Junchuang Lock
Optimizing Bolt Seal Storage: A Guide to Secure Handling – Junchuang Lock
Bulk Bolt Seal Orders MOQ and Pricing Strategies – Junchuang Lock